Since this is the wing of the blog for 'randomness', I feel this is as good a place of any to put this. Even though my blogs are on hiatus for a while, there is something I feel I have to say. I'm not the person to normally state my feelings on social or political issues because this blog isn't what that is for. I want this blog to be a safe place where people can come to get AWAY from all of that and just...be happy. However, this one thing needs to be said and, I promise, if I ever feel I have MORE to say about things in the world, I will create a separate place just for that so that it doesn't pollute the happy and positive vibe that I hope my blogs have. I don't expect this will make me any friends and I'm okay with that. It is just something that has been gnawing at my brain for a while that needs to be let out.
I'm sure EVERYONE knows about the shooting in Santa Barbara by now. A horrible thing to happen, really, and my heart goes out to all who suffered or lost someone because of it. That being said, my Twitter feed has, since the shooting, been FULL of feminist rant after feminist rant, usually coupled with the #YesALLWomen.
What this comes down to is this: I think it is high time that all that bullshit stopped. Separating ourselves from each other only creates a new problem. So, here's what I'm pitching: People-ism. We're all human. We all have our qualities and strengths and weaknesses. None of us are better than anyone else and we are all beautiful, valuable beings. So, why not stop with all the hate and flaming and create a group of people who believe that EVERYONE, no matter the race, gender, religion, sexual orientation, or anything else you can think of to nit-pick about, EVERYONE should be treated equally and with respect. (Please note, I didn't use the word 'humanism' because, by definition, it can exclude people of religion.)
Who knows? Maybe if we take out all of the 'sides' and at least TRY a little unity, things might improve? I mean, it is worth a shot, isn't it?
#YesALLPeople? Anyone?

Friday, May 30, 2014

Friday, January 3, 2014
DIY Pip-Boy Digital Photo Frame
This was one of The Wookie's Yule gifts. He's more than a bit obsessed with all things Fallout, so when I got this idea, I was stoked and worked on it in secrecy until the grand unveiling!
.JPG)
The photos of it on didn't come out so well, but there are much better ones of it off at the bottom, so stick with me. This is a pretty long tutorial. I did this all working off of screen shots of the game, and, of course, it isn't exact as I had to work with the frame shape.


First, I used Tulip Slick fabric paint in Deep Red...
...to paint on the small buttons and stripes, and the little backing for the large dial on the bottom left. Now, I needed some buttons. What to do...

I took some beads that were the right size and shape and, using the same fabric paint, I filled the middles in and let that dry.

While that was drying, I figured it was time to work on the gauge. I found this tiny charm in my jewelry stuff, so I used wire cutters to trim off the bail. I used another one just like this, cut in half with the same wire trimmers, for the dial part. I didn't take a picture, but for the ridges around the edge, I just took a pair of jewelry pliers that have the little teeth and crimped around the edges to make the ridges.

...wait...Okay, here's that 'before' picture of the awful couch I painted and made better and somehow in the folder for this post. I was wondering where that went...
Moving right along...

I took some acrylic paint and, with a teeny brush, painted on the actual gauge meter-thing-part. Ignore the thing on the left. That was my original dial, but I realized it was WAY too thin and ended up using the other charm. This would have looked better had I had a plain charm, but I was working with what I had on hand.

Once everything is dry on the buttons, it is time to paint!

I painted the frame itself with nail polish...I just mixed some greens with black until I came up with the right color. Sort of a deep, greyish, oliveish, blackish...mix. I did the details with a small brush in back and grey, and painted the buttons black on the edges with red and orange in the middle, and red and yellow in the one that was 'selected'.

Here it is painted, without the buttons. Time to glue!

This is the glue I used, and I swear by this stuff. It works on *almost* every project I use it for and it is the best thing I've found so far.

Once glued on, this is how it turned out...With flash...Where you can actually see the details.

It isn't perfect, but the Wookie was pretty stoked with it and I'm very happy with how it turned out considering it is kludged together.
<3
WW
.JPG)
The photos of it on didn't come out so well, but there are much better ones of it off at the bottom, so stick with me. This is a pretty long tutorial. I did this all working off of screen shots of the game, and, of course, it isn't exact as I had to work with the frame shape.


First, I used Tulip Slick fabric paint in Deep Red...
...to paint on the small buttons and stripes, and the little backing for the large dial on the bottom left. Now, I needed some buttons. What to do...

I took some beads that were the right size and shape and, using the same fabric paint, I filled the middles in and let that dry.

While that was drying, I figured it was time to work on the gauge. I found this tiny charm in my jewelry stuff, so I used wire cutters to trim off the bail. I used another one just like this, cut in half with the same wire trimmers, for the dial part. I didn't take a picture, but for the ridges around the edge, I just took a pair of jewelry pliers that have the little teeth and crimped around the edges to make the ridges.

...wait...Okay, here's that 'before' picture of the awful couch I painted and made better and somehow in the folder for this post. I was wondering where that went...
Moving right along...


I painted the frame itself with nail polish...I just mixed some greens with black until I came up with the right color. Sort of a deep, greyish, oliveish, blackish...mix. I did the details with a small brush in back and grey, and painted the buttons black on the edges with red and orange in the middle, and red and yellow in the one that was 'selected'.

Here it is painted, without the buttons. Time to glue!

This is the glue I used, and I swear by this stuff. It works on *almost* every project I use it for and it is the best thing I've found so far.

Once glued on, this is how it turned out...With flash...Where you can actually see the details.

It isn't perfect, but the Wookie was pretty stoked with it and I'm very happy with how it turned out considering it is kludged together.
<3
WW
Saturday, December 14, 2013
DIY Painted Couch!
I know I have, once again, been horrid about posting, but I'm about to make it up to you with a super huge project! In my defense, we had a pretty bad ice storm, so for the last week the internet has been spotty...This is actually my second attempt at posting this as the first time the internet would be on for 10 minutes then off for an hour or two, so I nerd-raged...
A bit of background: Someone gave us this couch forever ago. It is very old and looks to have been white at one point, but it had turned this dingy, stained, beige-ish, yellow-ish color. At the time, we had no couch, though, so we were happy to have it! We recently got a new couch for the living room, but this old one had a hide-a-bed in it that is perfect for when we have guests, so I really wanted to try to save it.
A few months back, someone gave me a TON of gauche. I had no idea what to do with it as I can't really canvas paint to save my life, but upon consulting Violet for ideas, figured it would pretty much work on whatever, so I decided to just try something completely random.

I pulled out all the bright colors of gauche since my craft room will be all bright and cheery and I wanted the couch to match. I had taken a before pic, but my camera is trying to give up the ghost, I think, and it somehow vanished. You can see how awful it was in the unpainted places in most photos, though.
You may not want to try this method if the furniture is going to be in a high-traffic area or if you have kids that spill because I really don't know how this would hold up to water, but since this will be used mostly to pile craft projects on unless someone needs to visit, fold out the bed, and crash on it, I wasn't concerned about that aspect.
It also had some frayed strings and edges on it, so I cut those off before I got started.

I started off by putting about a pea-sized dab of gauche straight from the tube onto a wet brush about an inch wide. I rubbed the paint into the fabric, then dipped the brush into water and kept working it around until the color was spread as far as it would go. Once that color was done, I repeated the process with the next color. Since you're using so much water, they will sort of naturally blend and run together. Also, where you use plain paint without watering and blending it enough it sill stay sort of crunchy, so be sure you add water and blend, blend, blend!

Inside and back...Ahhh, crafting with cats. I'm sure you can tell she "helped" the whole time. The older cat couldn't have possibly given a shit less what I was doing, but the kitten was all "OMG STUFF I CAN POTENTIALLY MESS UP!" the whole time.

Outside....Here, you can see on the back how dingy this thing was. I did the skirt on the bottom in solid back. Because, that's why. Please note the stuff on the carpet is strings I cut loose and paint splotches, not grime...although, this carpet is pretty grimy and won't be going with us into the new abode, hence me not worrying about what all I got on it.
Time for the cushions!

To tone things down a bit, I used blue for the cushions. Same method.

BLUE CUSHION! Big improvement.

Now, eventually I will finish this part, but this was WAY too hard to keep the cats off of even for the one tiny area I did, so I have to wait until I get it IN the new craft room to finish it so I can lock them out.
Either way, I took some puffyish fabric paint and outlined (and will outline the rest of) the piping in red.

Like so! :)

And done! I blacked out all the messy-ness of the paint on the floor so as not to distract from the overall picture. I left the back cushions, which were scavenged and not original to the couch - those were missing - the color they were since they also help tone it down a bit and do blend with some of the oranges and yellows.
This will be wedged in between shelving when it is at its proper home, so this is what you will see. Probably complete with cat. >.<

Side view! With strings and paint still all over the floor, haha!
All in all, I'm VERY happy with how it came out. It is bright and cheery, so it will be great in the craft room, and it is a VAST improvement over the stained, dis-colored bleh I started with. Totally saved this couch's life.
<3
WW
A bit of background: Someone gave us this couch forever ago. It is very old and looks to have been white at one point, but it had turned this dingy, stained, beige-ish, yellow-ish color. At the time, we had no couch, though, so we were happy to have it! We recently got a new couch for the living room, but this old one had a hide-a-bed in it that is perfect for when we have guests, so I really wanted to try to save it.
A few months back, someone gave me a TON of gauche. I had no idea what to do with it as I can't really canvas paint to save my life, but upon consulting Violet for ideas, figured it would pretty much work on whatever, so I decided to just try something completely random.
I pulled out all the bright colors of gauche since my craft room will be all bright and cheery and I wanted the couch to match. I had taken a before pic, but my camera is trying to give up the ghost, I think, and it somehow vanished. You can see how awful it was in the unpainted places in most photos, though.
You may not want to try this method if the furniture is going to be in a high-traffic area or if you have kids that spill because I really don't know how this would hold up to water, but since this will be used mostly to pile craft projects on unless someone needs to visit, fold out the bed, and crash on it, I wasn't concerned about that aspect.
It also had some frayed strings and edges on it, so I cut those off before I got started.
I started off by putting about a pea-sized dab of gauche straight from the tube onto a wet brush about an inch wide. I rubbed the paint into the fabric, then dipped the brush into water and kept working it around until the color was spread as far as it would go. Once that color was done, I repeated the process with the next color. Since you're using so much water, they will sort of naturally blend and run together. Also, where you use plain paint without watering and blending it enough it sill stay sort of crunchy, so be sure you add water and blend, blend, blend!

Inside and back...Ahhh, crafting with cats. I'm sure you can tell she "helped" the whole time. The older cat couldn't have possibly given a shit less what I was doing, but the kitten was all "OMG STUFF I CAN POTENTIALLY MESS UP!" the whole time.

Outside....Here, you can see on the back how dingy this thing was. I did the skirt on the bottom in solid back. Because, that's why. Please note the stuff on the carpet is strings I cut loose and paint splotches, not grime...although, this carpet is pretty grimy and won't be going with us into the new abode, hence me not worrying about what all I got on it.
Time for the cushions!

To tone things down a bit, I used blue for the cushions. Same method.

BLUE CUSHION! Big improvement.

Now, eventually I will finish this part, but this was WAY too hard to keep the cats off of even for the one tiny area I did, so I have to wait until I get it IN the new craft room to finish it so I can lock them out.
Either way, I took some puffyish fabric paint and outlined (and will outline the rest of) the piping in red.

Like so! :)

And done! I blacked out all the messy-ness of the paint on the floor so as not to distract from the overall picture. I left the back cushions, which were scavenged and not original to the couch - those were missing - the color they were since they also help tone it down a bit and do blend with some of the oranges and yellows.
This will be wedged in between shelving when it is at its proper home, so this is what you will see. Probably complete with cat. >.<

All in all, I'm VERY happy with how it came out. It is bright and cheery, so it will be great in the craft room, and it is a VAST improvement over the stained, dis-colored bleh I started with. Totally saved this couch's life.
<3
WW
Sunday, November 24, 2013
Craft Quickie - Bling Your Razor!
This is a super quick craft. Not really a tutorial, but it is something you could easily do yourself, in your own style, and with very little time...Just be sure and shave your legs right before you start as Loctite needs 24 hours to set up properly!

Grab your razor and take the cartridge off of it so you don't hurt yourself. Yep, I use a men's razor. It works better than any women's razor I've found yet. I actually stole this one from the Wookie.

I painted the non-grippy parts with my favorite nail polish (Ruby Pumps by China Glaze), then used the Loctite to glue on the little strip of chain and the skull. DONE! Make sure you use plenty of Loctite. I need to re-glue my chain as it fell off, but the Wookie fell in love with this, so I did his as well in green with gold chains and a gold lion's head pendant on the front. I used more glue on his and it has stayed on with no problem!
Easy!
<3 WW

Grab your razor and take the cartridge off of it so you don't hurt yourself. Yep, I use a men's razor. It works better than any women's razor I've found yet. I actually stole this one from the Wookie.

I painted the non-grippy parts with my favorite nail polish (Ruby Pumps by China Glaze), then used the Loctite to glue on the little strip of chain and the skull. DONE! Make sure you use plenty of Loctite. I need to re-glue my chain as it fell off, but the Wookie fell in love with this, so I did his as well in green with gold chains and a gold lion's head pendant on the front. I used more glue on his and it has stayed on with no problem!
Easy!
<3 WW
Tuesday, November 12, 2013
Random Photo Post - Critter Edition
It has been ages since I did a random photo post, so I guess it is about damn time!

This little guy landed on the glass part of the screen door one day and I couldn't resist a photo.
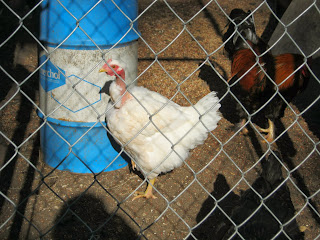
A neighbor's chicken...It is at that ugly, funny, adolescent stage, just getting in all its feathers.

We have these neighbors who are so awesome that they take in and rehabilitate abused horses. This little foal was so malnourished when they got him that he couldn't even stand.

As you can see, he's feeling much better now and is just the friendliest little guy!

Pretty, blue-eyed beauty.

Another rehab horse...I think he thought I had a carrot or something.

Yes. I do take a picture of EVERY butterfly I notice land on the door.

Der fishie.

GOATS!!! So cute. I used to mark all my photos, but I'm really too lazy for all that now.
Hope you enjoyed the critters!
Listening to: "Doom" - Black Gene for the Next Scene
<3WW

This little guy landed on the glass part of the screen door one day and I couldn't resist a photo.

A neighbor's chicken...It is at that ugly, funny, adolescent stage, just getting in all its feathers.

We have these neighbors who are so awesome that they take in and rehabilitate abused horses. This little foal was so malnourished when they got him that he couldn't even stand.

As you can see, he's feeling much better now and is just the friendliest little guy!

Pretty, blue-eyed beauty.

Another rehab horse...I think he thought I had a carrot or something.

Yes. I do take a picture of EVERY butterfly I notice land on the door.

Der fishie.

GOATS!!! So cute. I used to mark all my photos, but I'm really too lazy for all that now.
Hope you enjoyed the critters!
Listening to: "Doom" - Black Gene for the Next Scene
<3WW
Sunday, November 10, 2013
Bunny Plushie DIY
~*~*~*~*~*~*~*~*~*~*~*~*~
No, your memory is not failing you, nor is it that funny taste that may have been in your drink. Although, if that actually happened, you may want to look into it. You may have seen this post before. In an attempt to make everything easier to navigate for everyone, I am working on transferring all of the old beauty and craft posts from the recipe blog to their appropriate homes on the newer wings. I'll be only one a day so as not to clog up your feeds, so please bear with all the boring re-caps!
<3
-WW
~*~*~*~*~*~*~*~*~*~*~*~*~
This post is a tutorial for...SURPRISE! Another felt plushie. A bunny plushie!
You're in shock, aren't you?
Yes, I'm on a plushie kick.
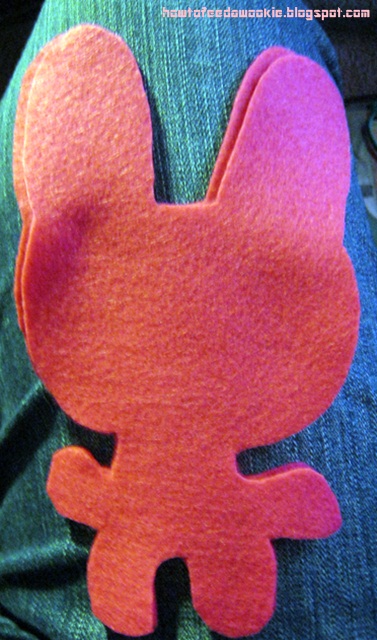
First, figure out what basic shape you want your bunny to be, then draw it onto the felt and cut it out of your desired color and don't forget to use two layers so you have a front and a back. I wanted my bunny to have an abnormally large head.

Using one of your body-pieces, lay it on your sheet foam and cut around it so you have a roughly bunny-like sheet foam shape, then sandwich them all together.

Play around with face parts and figure out how you want your bunny to look. This look really creeped me out, so I went with this one instead:

Once you get the look you want, either stitch or glue on all the pieces. I glued most of them, but stitched the tiny white pieces and the sequins for his dreamy little eye glimmers on with thread because hot glue and felt tend to be a hard combination to control at times, and I absolutely loathe a project with hot glue bubbles and strings sticking out all over the place, so if its something tiny where I'm afraid I won't be spot-on in my application, I use another method.
Sandwich it all together, stitch it up, and now you have yourself a bunny plushie.

A cute little happy one without the creepy "I'll-come-alive-and-kill-you-in-your-sleep" teeth.
Unless its a gift for someone you secretly hate and you want them to be peeking out at the evil thing from under their blankie at night and trembling in terror - then use the creepy face for him. This was for my niece and I love her and don't want to creep her out, so I made him all cute and friendly. :)
<3
The Wookie Wifey
Sunday, October 13, 2013
Charm Bracelets - Two Easy Ways
Charm bracelets have been around for quite a while. I see them quite often in stores, already fully charm-ed out, but sometimes you want something that's a bit more personal for yourself or for a gift, right? Well, here's two versions of how to make your own.

For the first version, you'll need a bracelet with decent-sized links, the charms of your choice, and jump rings.

I didn't have enough jump rings of a same size, so I took these off of this necklace which I was re-doing anyawy.
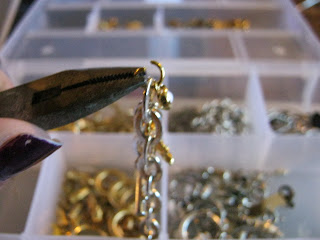
Next, take your needle-nose pliers, (I use two sets), twist the jump ring open, loop it through a link in the chain, add the charm, then twist it closed. Be sure to TWIST, not try to pull them open or you'll never get them to go back right and it will look pretty bad.
I find it helpful to count out how far apart I want the charms before I get started so I can be sure they will be evenly spaced and it will be as full as I want it to be when it is done.

...And there's version 1!

Easy!

For version 2, everything is the same except this time I made the bracelet itself from scratch as well.
I found some old chain I had lying around, trimmed it to the proper length. Then, using jump rings, I attached the toggle clasp to the ends.

Here it is with just the toggle on.

Once I had the clasp done, I began adding charms just like before.

Keep going...

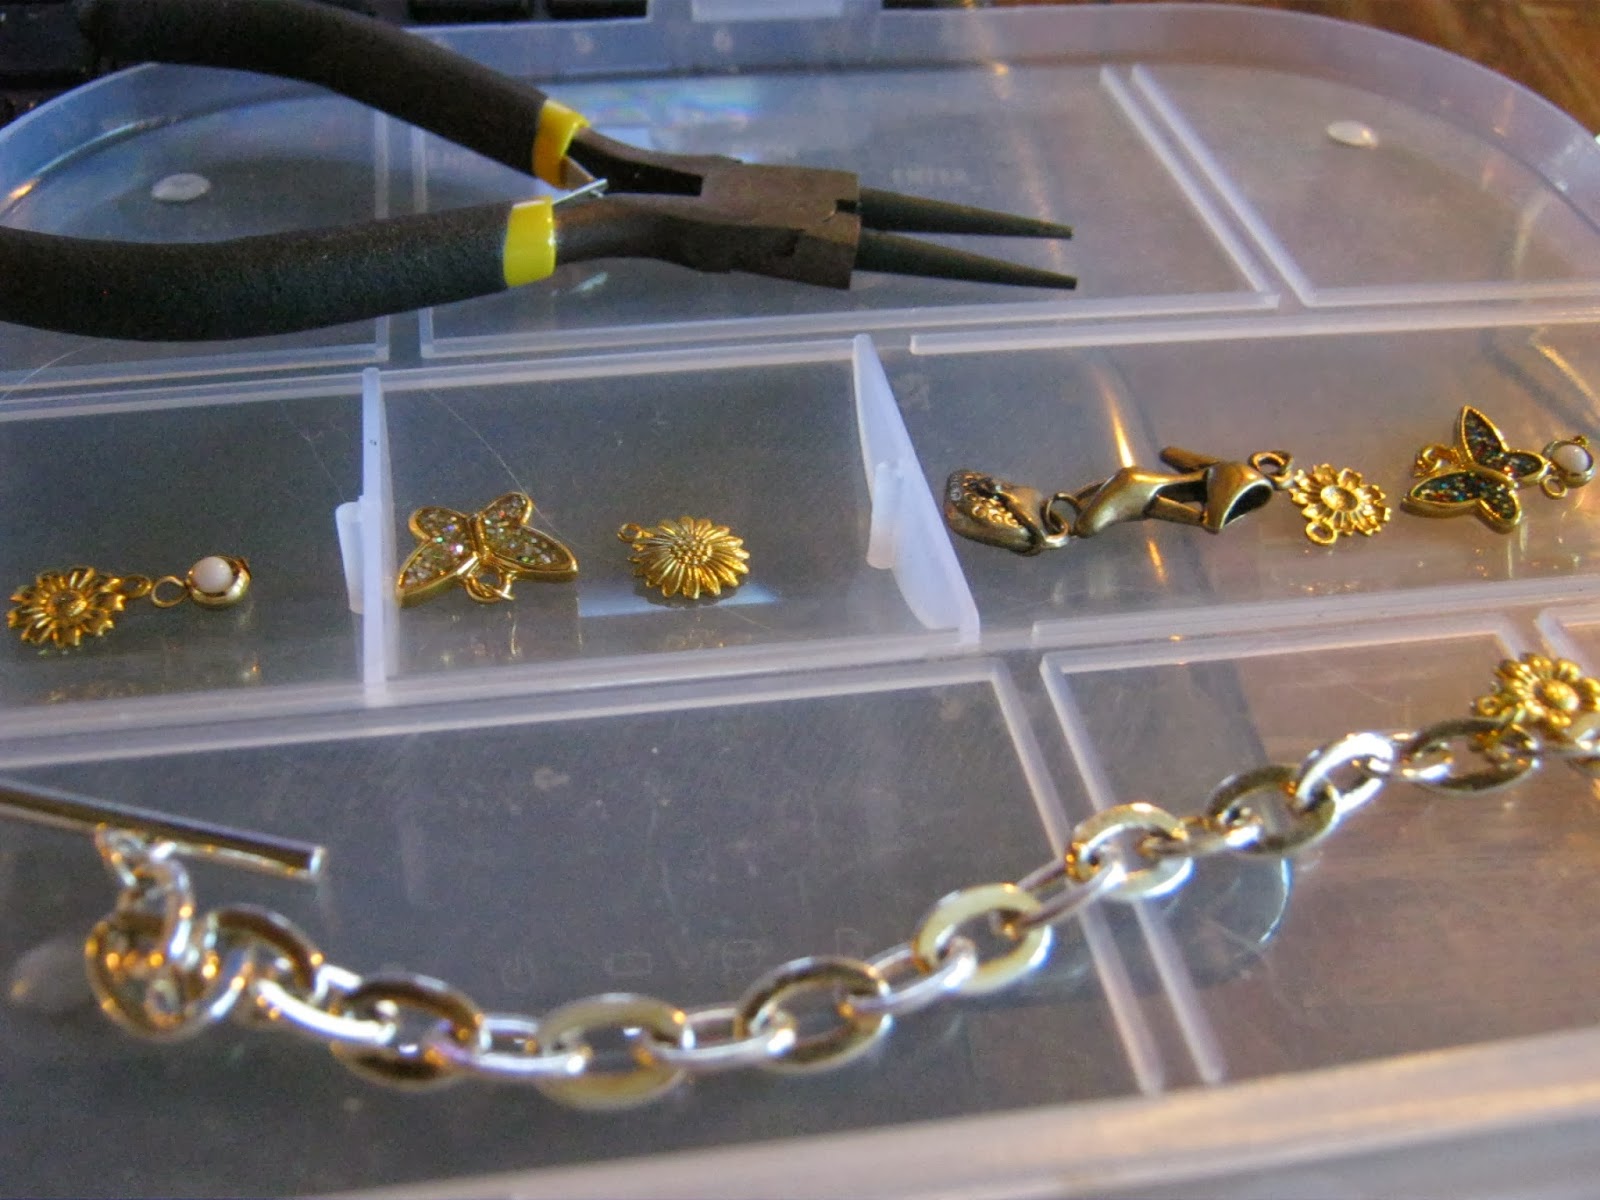
For the first version, you'll need a bracelet with decent-sized links, the charms of your choice, and jump rings.

I didn't have enough jump rings of a same size, so I took these off of this necklace which I was re-doing anyawy.

Next, take your needle-nose pliers, (I use two sets), twist the jump ring open, loop it through a link in the chain, add the charm, then twist it closed. Be sure to TWIST, not try to pull them open or you'll never get them to go back right and it will look pretty bad.
I find it helpful to count out how far apart I want the charms before I get started so I can be sure they will be evenly spaced and it will be as full as I want it to be when it is done.

...And there's version 1!

Easy!

For version 2, everything is the same except this time I made the bracelet itself from scratch as well.
I found some old chain I had lying around, trimmed it to the proper length. Then, using jump rings, I attached the toggle clasp to the ends.

Here it is with just the toggle on.

Once I had the clasp done, I began adding charms just like before.

Keep going...

And done!
<3
WW
Subscribe to:
Posts (Atom)