Cute crafts, nerdy crafts, frilly crafts, girly crafts, guy-friendly crafts, ALL THE CRAFTS!
Showing posts with label plushies. Show all posts

Sunday, November 10, 2013

Bunny Plushie DIY

~*~*~*~*~*~*~*~*~*~*~*~*~
No, your memory is not failing you, nor is it that funny taste that may have been in your drink.  Although, if that actually happened, you may want to look into it.  You may have seen this post before.  In an attempt to make everything easier to navigate for everyone, I am working on transferring all of the old beauty and craft posts from the recipe blog to their appropriate homes on the newer wings.  I'll be only one a day so as not to clog up your feeds, so please bear with all the boring re-caps!
<3
-WW
~*~*~*~*~*~*~*~*~*~*~*~*~

This post is a tutorial for...SURPRISE!  Another felt plushie.  A bunny plushie!

You're in shock, aren't you?

Yes, I'm on a plushie kick.
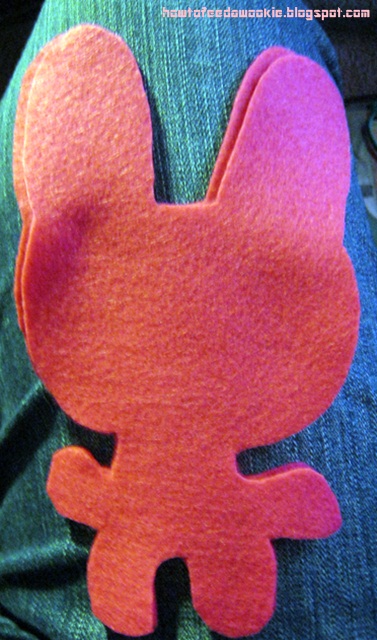


First, figure out what basic shape you want your bunny to be, then draw it onto the felt and cut it out of your desired color and don't forget to use two layers so you have a front and a back.  I wanted my bunny to have an abnormally large head.


Using one of your body-pieces, lay it on your sheet foam and cut around it so you have a roughly bunny-like sheet foam shape, then sandwich them all together.


Play around with face parts and figure out how you want your bunny to look.  This look really creeped me out, so I went with this one instead:


Once you get the look you want, either stitch or glue on all the pieces.  I glued most of them, but stitched the tiny white pieces and the sequins for his dreamy little eye glimmers on with thread because hot glue and felt tend to be a hard combination to control at times, and I absolutely loathe a project with hot glue bubbles and strings sticking out all over the place, so if its something tiny where I'm afraid I won't be spot-on in my application, I use another method.

Sandwich it all together, stitch it up, and now you have yourself a bunny plushie.


A cute little happy one without the creepy "I'll-come-alive-and-kill-you-in-your-sleep" teeth.

Unless its a gift for someone you secretly hate and you want them to be peeking out at the evil thing from under their blankie at night and trembling in terror - then use the creepy face for him.  This was for my niece and I love her and don't want to creep her out, so I made him all cute and friendly.  :)

<3
The Wookie Wifey

Wednesday, September 4, 2013

Hearthstone Plushie DIY

~*~*~*~*~*~*~*~*~*~*~*~*~
No, your memory is not failing you, nor is it that funny taste that may have been in your drink.  Although, if that actually happened, you may want to look into it.  You may have seen this post before.  In an attempt to make everything easier to navigate for everyone, I am working on transferring all of the old beauty and craft posts from the recipe blog to their appropriate homes on the newer wings.  I'll be only one a day so as not to clog up your feeds, so please bear with all the boring re-caps!
<3
-WW
~*~*~*~*~*~*~*~*~*~*~*~*~

This is one of my favorite projects still, even as simple as it is.  :)  It is just one of those things that gives me a happy every time I see it!

Isn't it obvious I just HAD to do this?  I mean, come on.  Its cute.  And home is where the hearthstone is, after all.  Which is usually either Undercity or Orgrimmar.


This was easy, but if you're confused on a few of the plushie steps, I've made a few already so you can check out this one if you need more clarification since its tutorial is pretty in-depth.  :)  Above, the hearthstone I made is pictured with Lurky, whom the Wookie got me from the Blizz store because he loves me and he's awesome.  (Not sponsored, duh, I'm just a WoW nerd.)


Since I didn't have any grey felt, I used white.  As usual of my plushies so far, I only have that sheet foam you see up there, so the stitching is on the outside because that stuff is nearly impossible for the inside-out-stitch-then-flip-and-stuff method.  Admittedly, though, the stitched-together-DIY look is rather starting to grow on me.

Back to business, cut out your two hearthstone shapes - I drew it on the felt in my awesome off-brand yellow sharpie (its hard to tell because is so cheap the print is fuzzy, but I think its technically a "Shoupie" or some shit and I have no idea why I find that so entertaining.), then cut them out.  Same with the swirl.  Three cheers for super easy patterns!

Once you have the hearthstone shapes, lay one on top of the foam sheet, then trim the foam around it to get your stuffing.  If it is the same size as your felt or even a teeny bit bigger, that's okay, you can just squish it in as you sew and it will be fluffier, just make sure it's not WAY too big or else it will try to fold and curl up and then you'll have a lumpy hearthstone.


Stack 'em and stitch 'em.  I used white embroidery floss, then just glued the swirl onto the front with hot glue because I wanted the swirl to be flat instead of all stitch-y,  but its whatever you prefer.


DONE!  Set it with your favorite innkeeper and there ya go!  I'm going to Azeroth now, I don't want to live on this planet anymore.

<3
The (totally nerdy) Wookie Wifey

Friday, August 23, 2013

Felt Kitty Plushie DIY

~*~*~*~*~*~*~*~*~*~*~*~*~
No, your memory is not failing you, nor is it that funny taste that may have been in your drink.  Although, if that actually happened, you may want to look into it.  You may have seen this post before.  In an attempt to make everything easier to navigate for everyone, I am working on transferring all of the old beauty and craft posts from the recipe blog to their appropriate homes on the newer wings.  I'll be only one a day so as not to clog up your feeds, so please bear with all the boring re-caps!
<3
-WW
~*~*~*~*~*~*~*~*~*~*~*~*~

This is the longest tutorial I have ever done by far, but it was worth the adventure and the effort because the result is undeniably adorable.


I'd been seeing hand-made felt plushies all over the web and really wanted to try one, but my sewing skills are meager at best.  I decided to take a stab at it anyway, and I'm glad I did because she's pretty cute.  I didn't follow a pattern or anything, and its all by hand since I neither own, nor can operate a sewing machine, but here's how I made her.


First, I cut out her shapes.  I figured that big piece would be a good basic body shape, so I drew it out on the felt with a sharpie then cut it out of two layers so I had two of those.  Then, I cut out the eyes, ears, nose, tail pieces (not pictured since it didn't occur to my dumb ass until several minutes later that she'd need one) and the 4 little triangular arm pieces.  I drew out the arms, but the rest I just free-handed with the scissors...Free cut?...Free scissored?...Free snipped?

Anyway.


I picked the piece I wanted to be the front and stitched on her eyes and nose and embroidered any details I wanted.


Then, its time to sew up all her little extremities.  I cut out two teeny little pieces of foam, squished them between the arm pieces, and stitched all the way around.  I originally wanted to sew her inside out then flip her right-side out and stuff her, but that wouldn't work as the only stuffing I had was this sheet foam stuff.  I told you, I don't sew.


Once i had the arms done, I cut two little slits in her body where I wanted them to go, then gently pulled the skinny ends of the arms through the holes.


Once they were through, I pinched them together and stitched them on from the inside.  You can also see here, that I flipped the piece of felt so that the sharpie outlines go on the inside...Good thing to keep track of.


Now, for the tail.  I wanted the tail to be bendable, so I folded up a pipe cleaner to go in it.  I bent it to the basic shape, making the end that would attach to her bum thicker by folding the pipe more there, and twisted the ends of the pipe cleaner into itself so it would poke through the felt.


Then, I stitched one side of the tail together, went about half way down the other side, then put the pipe cleaner in.  Then, holding the pipe cleaner between the felt, I stitched it up the rest of the way around.


Now, to attach the tail, take the back piece of your  kitty and snip a little vertical slit where you want her tail to sit.


Stuff it through and stitch it on the way you did the arms.  You'll just have to go for it since this, sadly, is the best picture I came up with.  Fail.


Next, put the pieces together, cut a piece of foam that is only slightly smaller than your animal but in roughly the same shape, stack them together sandwich-style, and begin stitching all the way around.  Don't forget to add the ears in when you get to the place on the head where you want them.  Just add them to the sandwich, pin them in place if you want, and just keep sewing.


Done!


Now, Kitty from all angles!  I added some of my old earrings to her...


And an old skull charm.  Eventually I'll replace the embroidery thread collar with a ribbon one, but I don't have any ribbon.  I'm a horrible, broke crafter.


From the back...


And one more just for fun.  I completely on accident made her tail just long enough that it causes her to stand on her own, which is a real added bonus.

Let me know if you make one of your own, I'd love to see it!  I also made a 6-zombie mini-horde of felt zombie plushies for the Wookie, but I'll save those photos for the one of the next snapshot posts I decide to do...Give you something to look forward to and all.  :)

<3
The Wookie Wifey